Create a Macro in Excel
With Excel VBA you can automate tasks in Excel by writing so-called macros. In this chapter, learn how to create a simple macro which will be executed after clicking on a command button. First, turn on the Developer tab.
Developer Tab
To turn on the Developer tab, execute the following steps.
1. Right click anywhere on the ribbon, and then click Customize the Ribbon.

2. Under Customize the Ribbon, on the right side of the dialog box, select Main tabs (if necessary).
3. Check the Developer check box.

4. Click OK.
5. You can find the Developer tab next to the View tab.

Command Button
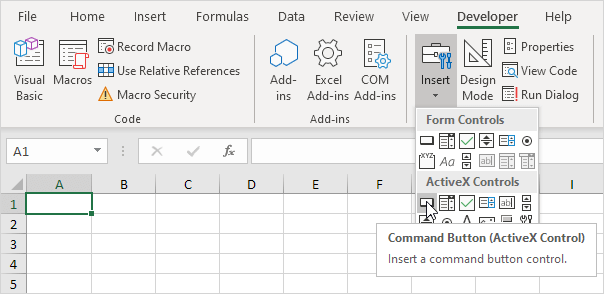
To place a command button on your worksheet, execute the following steps.
1. On the Developer tab, click Insert.
2. In the ActiveX Controls group, click Command Button.

3. Drag a command button on your worksheet.
Assign a Macro
To assign a macro (one or more code lines) to the command button, execute the following steps.
1. Right click CommandButton1 (make sure Design Mode is selected).
2. Click View Code.

The Visual Basic Editor appears.
3. Place your cursor between Private Sub CommandButton1_Click() and End Sub.
4. Add the code line shown below.

Note: the window on the left with the names Sheet1 (Sheet1) and ThisWorkbook is called the Project Explorer. If the Project Explorer is not visible, click View, Project Explorer. If the Code window for Sheet1 is not visible, click Sheet1 (Sheet1). You can ignore the Option Explicit statement for now.
5. Close the Visual Basic Editor.
6. Click the command button on the sheet (make sure Design Mode is deselected).
Result:

Congratulations. You've just created a macro in Excel!
Visual Basic Editor
To open the Visual Basic Editor, on the Developer tab, click Visual Basic.

The Visual Basic Editor appears.
